



If you have a finished room tucked under a sloped roof — a converted attic bedroom, a bonus room, or an upstairs room in a Cape Cod-style home — it probably feels too hot in summer and too cold in winter, no matter how long the heating or cooling runs. The culprit is often not your furnace or air conditioner. It is the short walls hidden behind closets and eaves doors: the knee walls. Because they separate a heated room from a vented attic just inches away, poorly insulated knee walls let heat move straight through. The good news is that this is one of the most fixable energy problems in a house, and most homeowners can fix it in a single weekend.
What Knee Walls Are and Why They Leak Energy
A knee wall is a short vertical wall, usually 3 to 5 feet tall, where a sloped ceiling meets the floor of a finished attic room. On one side is your living space, kept at around 70°F. On the other is a small triangular attic space that follows outdoor temperatures — over 120°F on a summer afternoon, below freezing in winter. That difference drives heat through the wall all day.
Older knee walls leak energy for three reasons. First, many were built with thin batts, sometimes only R-11, or with no insulation at all. Second, those batts have often sagged or fallen away, leaving bare drywall exposed to attic air. Third, and most importantly, the wall was rarely air sealed. Gaps at the top and bottom plates, open floor joists underneath, and holes for wiring let conditioned air flow into the attic. Moving air carries far more heat than conduction through drywall alone, which is why a room can feel drafty even when some insulation is present.
Assessing Your Knee Walls
Start by getting into the attic space behind the wall through a closet hatch or eaves door. Bring a flashlight, tape measure, gloves, dust mask, and your phone for photos. Work on a cool morning, because those small attic triangles heat up fast.
Check these points before you buy any material:
- Existing insulation: Note type, thickness, and condition. Is it sagging, damp, or missing?
- Cavity depth: Measure the studs. Most knee walls use 2×4 studs (3.5 inches deep) or 2×6 studs (5.5 inches deep), which limits what fits.
- Air leaks: Look for daylight, dusty insulation (a sign of air washing), and open joist bays under the wall.
- Moisture: Stains, mould, or wet sheathing mean fix the roof or ventilation problem first and let everything dry.
- Wiring and fixtures: Note electrical boxes and plumbing vents needing careful sealing — never bury a fixture unless it is rated for insulation contact.
Measure length and height to calculate square footage. A typical run might be 20 feet by 4 feet, or 80 square feet per side — the number that drives material cost for every method below.
Fiberglass Batts Technique
Fiberglass batts are the cheapest and most familiar option, and they work well when installed carefully. For a 2×4 wall, use R-15 high-density batts made for 3.5-inch cavities. For 2×6 framing, R-21 is standard. Batts cost about $0.50 to $0.90 per square foot, so an 80-square-foot wall can cost as little as $40 to $75.
Cut each batt slightly longer than the cavity height and press it in so it fills the space fully, without being stuffed or folded. Split it around wires and pipes instead of compressing it behind them — compressed fiberglass loses R-value. It should touch all sides of the cavity with no gaps.
Covering Batts on the Attic Side
This step is what most old installations missed. Batts left exposed to attic air lose performance when wind washes through them, and they tend to sag over time. Cover the attic side — house wrap stapled neatly is the minimum, but 1/2-inch foam board or OSB offcuts work better and hold batts in place for decades.
Rigid Foam Board Method
Rigid foam board is an excellent choice when cavity depth is limited or you want insulation and an air barrier in one product. Polyisocyanurate (polyiso) offers about R-6 to R-6.5 per inch, extruded polystyrene (XPS, the pink or blue board) about R-5 per inch, and expanded polystyrene (EPS) about R-4 per inch. A 2-inch layer of polyiso adds roughly R-12 to R-13 on its own. Material typically runs $1.00 to $2.00 per square foot.
You have two ways to use it. You can cut boards to fit snugly between the studs — the “cut and cobble” method — sealing every edge with canned foam. Or, simpler and often better, screw continuous sheets across the attic side of the studs, over batts already in the cavities. That continuous layer also covers the studs, which otherwise act as thermal bridges conducting heat around the cavity insulation.
- Cut with a utility knife and straightedge, or a fine-tooth handsaw for thicker board.
- Seal every seam and edge with foil tape made for foam board, or a bead of canned foam.
- Fasten with cap-head screws or large washers so the heads do not pull through.
- Check local code: most foam boards left exposed need a thermal barrier, such as 1/2-inch drywall, unless rated for exposed use.
Spray Foam Option
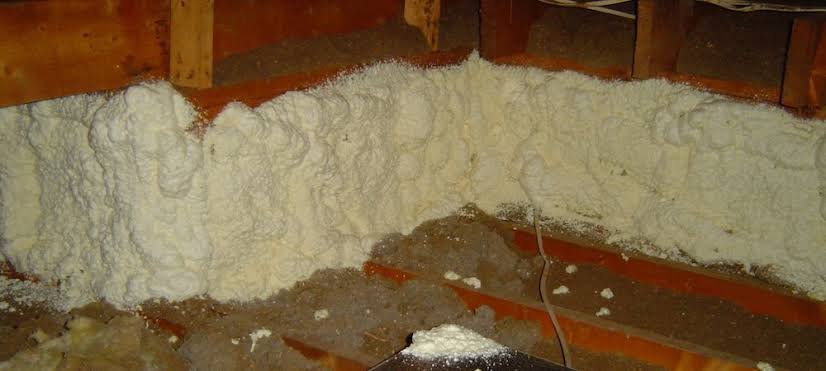
Spray foam gives the best combined result because it insulates and air seals in one application, filling irregular gaps that batts and boards miss. Closed-cell foam provides about R-6.5 to R-7 per inch and adds rigidity and moisture resistance. Open-cell foam provides about R-3.6 to R-3.8 per inch and costs less, though it does not resist vapour the same way.
For most homeowners this is a professional job. A contractor spraying 3 inches of closed-cell foam on an 80-square-foot wall might charge $350 to $600, depending on region and access. Small DIY froth-pack kits can suit a single short wall, but they cost nearly as much per board foot as hiring a pro, and the foam is unforgiving if the chemicals are cold or mixed poorly. If your wall area is large, get two or three quotes — the per-square-foot price usually drops on a bigger job.
Air Sealing Details That Make Insulation Work
Whichever insulation you choose, air sealing decides whether it performs at its rated R-value or at half of it. Do this work first, while the cavities are open and easy to reach.
- Seal the top and bottom plates: Run a bead of caulk or canned foam along where the wall framing meets the attic floor and the sloped ceiling.
- Block the floor joists: Joist bays under the wall are open highways for air. Cut rigid foam blocks to fit each bay, set them in line with the wall, and foam around the edges.
- Seal penetrations: Foam around electrical cables, plumbing vents, and duct runs passing through the wall or floor.
- Weatherstrip the access door: It should close against weatherstripping, latch tightly, and be insulated on its attic side with foam board.
Test your work by holding a lit incense stick near the wall edges on a windy day. Smoke streaming sideways shows a leak; smoke rising straight up shows the seal is working.
Insulating the Attic Floor Behind Knee Walls
The narrow strip of attic floor behind the knee wall is easy to overlook, but if it sits above a heated room, it is part of your thermal boundary too. Heat rises from the room beneath and is lost through an uninsulated floor section to the vented attic. Cold attic air can also wash under the wall and chill the finished floor along the edge of the room — the reason that floor often feels cold in winter.
Once your joist blocks are in place, insulate that floor strip to match the rest of your attic floor, ideally R-30 to R-49 depending on climate zone. Blown loose-fill cellulose or fiberglass is fastest, but batts laid tightly between joists also work. Keep insulation clear of heat sources, do not block soffit vents — install baffles if the strip reaches the eaves — and avoid compressing it under storage boards, which reduces its performance.
Final Thoughts
Knee walls are a small surface with an outsized effect on comfort. A typical project uses modest material — often $100 to $300 done yourself with batts and foam board — yet homeowners routinely report that an upstairs bedroom finally holds its temperature, the air conditioner cycles less, and winter drafts along the floor disappear. The formula is always the same: assess honestly, air seal thoroughly, fill the cavity completely, and cover the attic side so the work lasts. Do those four things with any technique above, and a wall that was leaking heat in both directions becomes a real part of your home’s thermal envelope.
Frequently Asked Questions
What R-value should knee wall insulation have?
Aim for at least R-15 in a 2×4 wall and R-21 in a 2×6 wall from cavity insulation alone, then add foam board on the attic side if you can. Many codes now call for R-20 or more. More important than the number is a full, gap-free fill plus air sealing — a well-installed R-15 wall outperforms a sloppy R-21 one.
Can I insulate knee walls myself, or should I hire a pro?
Batts and foam board are very DIY-friendly with basic tools and protective gear. Hire a pro for spray foam, for suspect wiring or active moisture problems, or if access is too tight to work safely. Get quotes anyway — for a small wall, a pro’s minimum charge may be close to your DIY material cost.
Should I insulate the sloped roof instead of the knee wall?
Only if you want that attic triangle to become conditioned space, for example because ducts run there or you store temperature-sensitive items in it. Insulating the slope costs more and needs careful vapour and ventilation detailing. For most homes, insulating the knee wall and the floor strip behind it is cheaper and just as effective.
Do I need a vapour barrier on a knee wall?
It depends on climate and material. Closed-cell foam and XPS already slow vapour at sufficient thickness. With batts in a cold climate, painted drywall on the room side often serves as the vapour retarder, and adding plastic sheeting can trap moisture. Check local code before adding any separate barrier.
How much does knee wall insulation cost overall?
For a typical 80-square-foot wall, expect roughly $75 to $200 in materials for a DIY batt-plus-foam-board job and $350 to $600 for professionally installed closed-cell spray foam. Because the area is small, labour and access affect price more than material, and payback through lower bills and better comfort is usually fast.